How lucky am I?

One day I am looking at some posts from Andy Corrigan where he had published some pictures of two-stroke porn (porting photos).  They were from a guy in Melbourne.  I reached out to Shane Gardiner who had done the work and messages were flying backward and forwards over the next few hours.

A couple of days later I gave him a call on the phone.  Like a lot of people, he was interested in salt racing but hadn’t got there yet.  I don’t think he had worked on anything quite like my project.

I know very little about porting and have only one experience with modifying the exhaust port on my Suzuki A100.  Every conversation we had either made sense or lined up with something I had read in one of the Two-Stroke tuning books.  Along the way, Shane was able to help me discount some snake oil ideas I had been considering.

I quickly worked out that with Shane’s help this engine could go from good to great.  It didn’t take much arm twisting to get him on the team.  So the next minute the heart of my project was off to Victoria to get a good looking at.  I gave Shane free rein with what he thought was best.

Things changed and moved a lot along the way from what I  thought would be involved.  I had a very simple vision of just a little bit of porting and what would be done.  How wrong was I?  Shane talked with me about many things and help me make  decisions for the right reasons and result.

Shane ended up getting my cylinders all lined up.  One of them had seen some “Dad porting” with knife-edged transfer dividers and some large ball cutter marks, cuts and radius where they didn’t need to be, probably making performance worse, not better. Shane said he would make the best of it he could.  There is a lot of maths that goes into porting and if you get it wrong, your barrel can be valueless scrap.

We did price up what a new barrel would cost but at just under $800 it was out of the question.

I was also going to buy a head that you can change the chamber inserts.  The problem was that the standard inserts are designed for motocross, not land speed racing.  Shane said he could sort them and had some ideas.  Next minute I’ve arranged for a head to be posted from the UK directly to him in Victoria.  Then I start to get photos like these.

The inserts are not finished in these photos, but I’m sure you can get an idea.

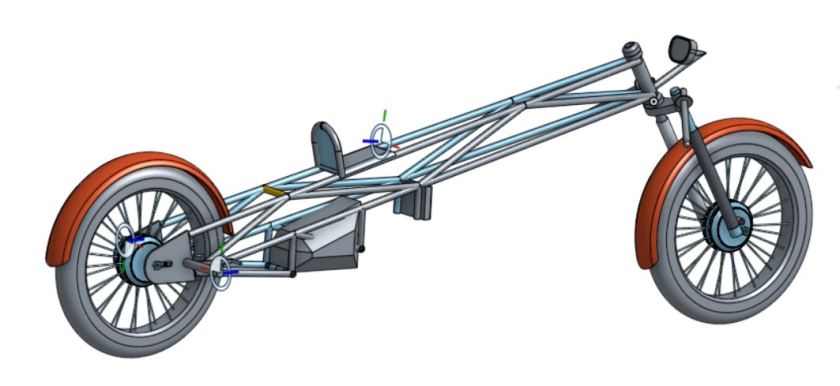
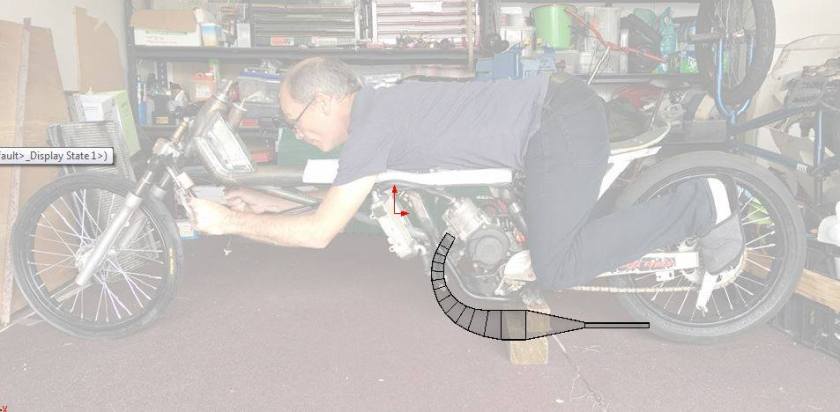
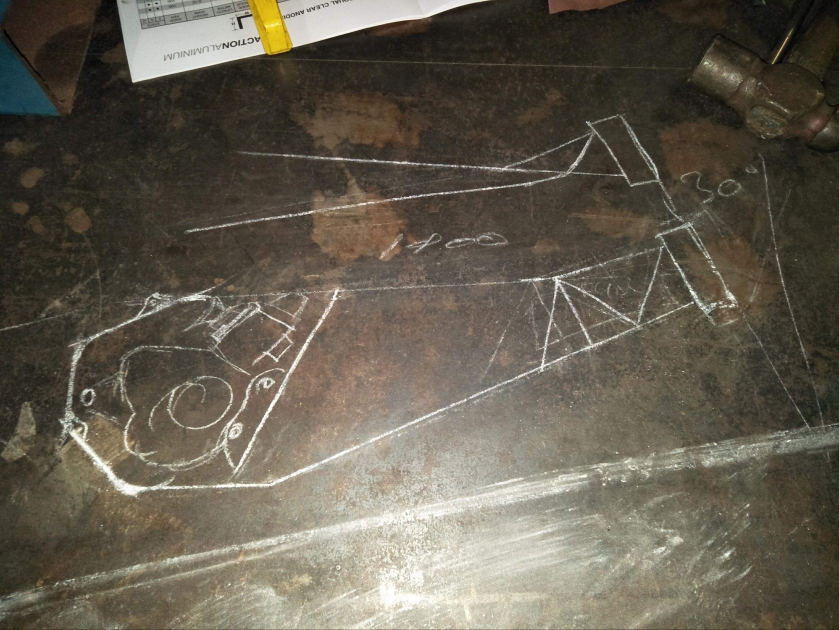
To make it all work I also need a pipe that was going to do the job.  The art and it is an art of building two-stroke pipes is a dying one.  I had asked around my contacts to see who could give me some advice.  I was struggling.

Shane offered to help out again, he drew up a design that would work with my setup with the tall gearing and rolling resistance.

That was fine but it also had to curve so it could fit under the frame and not hit the ground.  Now Shane didn’t have the bike and I didn’t have the engine so everything was done remotely with messages and photos.

He was able to come up with something that worked and would clear everything.

49698509_1166315443519399_7940774070738485248_n

How will it ride?

Now that I have the engine running I had to take it for a ride.  But where can you test a bike like this that would be safe for the public and rider?   I did a lot of looking around on Google maps to find a suitable location.  After scouting out the location and getting the appropriate permit I was set to give it ago.

Now riding a new bike for the first time is not always easy.  Try lying down, working out how to put the bike into gear and take off without falling over.

To make it harder the bike only has one brake.  While we are talking brakes, the guys at HEL Performance did a great job on my custom brake and clutch lines.  They were also able to make them in KTM orange.

I was only able to make a few quick runs before my permit expired.  It all went pretty good and the bike felt great even though it was built out of used parts.

I did have one little low-speed issue when I was trying to turn the choke off.  Apart from that, the bike ran straight and true.  The front tire I got was not great combined with the steering lock set at 15 degrees each way.

It was a great start.

Still many unknowns

I started building this bike on the basis of converting a 65cc back to a 50cc.  I had heard of people doing it but never seen on in the flesh.  It was a big punt and not simple by any means.  I started talking to a few guys in Europe who started to steer me in the right direction and it sounded like it was going to work.  Before proceeding much further we needed to prove a couple of things.  One, the engine would work and two the bike was rideable.

I asked around and found the parts I needed to put the engine together from used parts.  Less than ideal but I didn’t want to dump a whole lot of money into something that still might not work.  I had everything but a piston.  I reached out to  who rebuilds lots of small KTM’s.  He happened to have a piston that he had pulled from his son’s bike that would work.

I got the engine all bolted together and now need an expansion chamber to make it work.  I did have the KTM 50 sx one but it interfered with the frame.  With a small modification, could make it work.  I reached out to Andy Corrigan who has helped many 2 strokers to make a small part on his lathe.  Next minute he is doing the welding too.

Now it was time to see if it would work……………..

It’s starting to look like a motorcycle

So after getting the top tube back from the lobster back being welded, we could start to see what it was going to look like.  I wanted to keep the chain length standard and that was part of the reason we extended forward.

The top tube served two purposes, it gave me something to lay on and became the fuel tank.

With a small-capacity motorcycle, wind resistance is one of your enemies.   By making the profile smaller you have less energy consumed pushing through the air.  As you can see from the front profile it’s not to bad.  It works out to be somewhere just under 1m2.

Now the rear wheel was not going to cut it at 10″.  There was no way I was going to get speed rated 10″ tires, the belly was going to drag on the ground and it would look ridiculous.  Where ever possible I was trying to reuse parts from the donor bike.  So I pulled the rear wheel apart, found the smallest width rim I could find and went to Ash’s Spoked Wheels

I explained what I was trying to do and they said no problem.  I have laced a couple of wheels before so I said I just needed the spokes.  A couple of days later I picked up the parts.  The wheel was a dream to put together, Ash put the 4 different spokes in 4 pouches, each pouch marked if it was brake or disc side, inner or outer.  Often you have to trim down the end of the spokes so they poke into the tube.  All the spokes were a perfect length.  Ash knows his stuff.

Making progress

There were a number of iterations in the chassis design. We eventually settled on the simplest. I wanted something that was going to look good as well as worked.

What we ended up doing was extending the frame forwards. It completely changed my body position for the better. I now had weight on my feet and a flat back.

It did require some nice welding that Steve from https://www.aly-tek.com.au was able to sort out.

Warhorse Racing Meeting

It was a long wait while I was waiting for John to return from holiday.  He got home on a Sunday and I was there on Sunday afternoon with what I had been able to achieve on the back of my son’s ute.  We had a good chat, he lent me a Tony Foale Motorcycle Chassis design.  He pointed out some things I hadn’t considered and made some great suggestions.

I took the book home and read the sections that applied to what I was trying to do.  Three weeks go by and I get a message from John.  “Bring your stuff around, bring all off it”  I didn’t have to be asked twice.

John thought what I was doing was ok but didn’t like my choice of tube size and wanted to go up to 7/8″ from the 3/4″ that I was using.  I had the new tube there the next day.

IMG_2278

I knew I wanted to get lower.  And I thought longer was the way to do it but I missed one of the fundamentals of land speed racing and that’s getting through the air.  It’s really important to get your back flat.  And as you can see from the photo above I missed this principal.  Luckily John picked up on it so we reset to the idea below.

IMG_2306

Then out came some Chalk CAD on how we could mount the motor and I was back on track.

IMG_2318

I found one

IMG_2201

It doesn’t look like much but it was the bones I needed.  It was sick but complete.  What I didn’t realize at the time was how valuable/useful the additional components I received with the bike.

So the first thing I did was get it back together and gave it a run.  It didn’t run well but it was going to get fully rebuilt anyway.  The water circulated and the gearbox changed through the gears.

Now I had something to try to fit into my frame.  Still, didn’t know how it was going to work but I had the engine I wanted to use.  My plan was to keep the old dirt bike as a test frame I could fit the engine to run it on the dyno.

I knew I needed help and put the call out to a few friends.  Someone suggested I talk to John at Warhorse Racing.  I made contact and he said come and see him when he got back from holidays.

Time to get some tubes

A land speed bike is quite simple, wheel at the rear that doesn’t need suspension, a wheel at the front with forks that can move 15 degrees each way and some tubes joining them all together.

I was able to get the tubes linked together but what I struggled with was how to mount the motor.  Its important that the motor is square to the frame and the front sprocket is in alignment with the rear sprocket.  It was my idea to have no bends in the tubes to keep it all strong and simple.  This wasn’t able to work because the head would not fit up between the bottom tubes.

The engine in the frame above was not the engine I wanted to use, it was the one out of my Yamaha TZR50R.  I really wanted to run a KTM because of the ease of getting parts and the development they have been doing.  So I started looking for a damaged KTM 65SX.

Time for a new build for 2019

After having a great time down at the salt in 2018 I was keen to go back and go faster.  I chased all week trying to get to 75mph  from 73mph but whatever trick I tried I couldn’t get there.

So time for a new plan.  I need to get my frontal profile down and the only way I was going to be able to do this was with a custom chassis.

My plan was to start with a donor bike.  This would give me a couple of wheels, a set of forks and maybe some other things I don’t know that I need.  I decided on a Honda NBC110 because there is quite a number of them here in Australia.

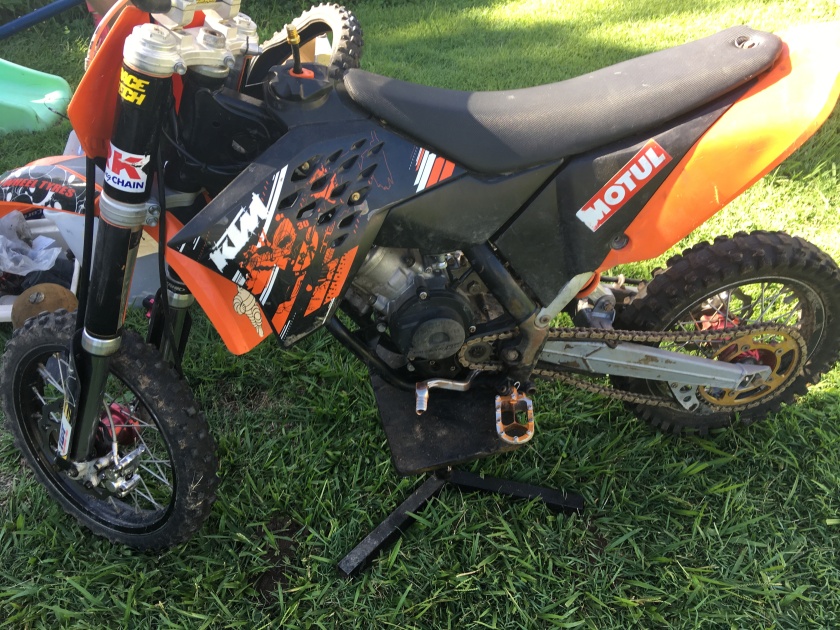
 The bike had worked for Auspost and was retired early.  The guy I got it off did me a great deal.  He kept the engine and wheels so I got the rest.  Though the power of the internet Jock from Handlebar Haven reached out to my request for some wheels.  Jock is an interesting guy who has ridden east to west across Australia on a postie bike including the Simpson Desert.

I decided to try to draw up my chassis in CAD so I could see how things would fit and work together.  I did not know much about 3D drawing so there was quite a steep learning curve.

TZR Frame